
I know that you found this article because you are really stuck in creating city boundaries inside a Google Map! It’s a big issue. There’s no good article or content on the web that describes doing that.
In the initial days when I started working with Google Maps in my Android app, I got stuck at this process and it took me a lot of time to figure things out, but for others, not to commit the same mistakes and waste time, I am sharing this article!
So here I am with the easiest way to create a city boundary in Google Maps for android! This article will guide you through each aspect required and I will teach you to create the boundary within 10 minutes!
Prerequisites
For this project, I assume that you have already created an Android app with Google maps embedded and working. Now, let us dig into the process of making the boundary of a city into the map. Follow the steps given:
Get JSON format of the boundary co-ordinates
This is the first thing we would need. JSON is an easy way to save and transport data. We need to store the co-ordinates of the city boundary in it.
This means we will take each point on a city’s boundary and then use it to form a polygon with desired colors which will then serve as the boundary in our map.
How to get the co-ordinates?
Here’s a list of websites you need to get the working JSON file containing the coordinates of the boundary.
Required structure of the file
Here is the format of the JSON you will need to use in order to store the JSON data you will obtain, which then will be added to the map. You will need this later when you will watch the video below.
{
  "type": "FeatureCollection",
  "features": [
    {
      "type": "Feature",
      "properties": {
        "title": "<add-city-name-here>"
      },
      "geometry": {
        "type": "Polygon",
        "coordinates": [
          [

          ]
        ]
      }
    }
  ]
}
Process
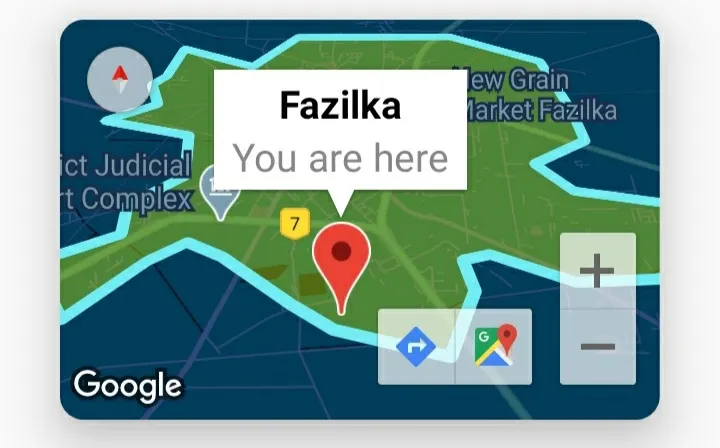
Follow the process in this video and you will be presented with a JSON kind of file. Save this file since it will be used to draw a boundary on the google map. I will be creating the map for Fazilka, the city where I live. The process would be the same for almost all other cities.
Now, since you have the JSON file, you can include it in the Android project.
Under the res folder, make a directory named raw by Right-Clicking > selecting New > selecting Directory, and be sure you type raw as its name. Then just copy/cut and paste the JSON file you made into the raw folder.
Code
Now comes the fun part. The code is extremely easy to follow and use. Please be sure to add the following code in the onMapReady() function.
JSONObject cord = new JSONObject(R.raw.file); //Please replace 'file' with the name of your JSON file

GeoJsonLayer geoJsonPolygonLayer = new GeoJsonLayer(googleMap, cord); //Please replace the googleMap with your own map's instance
GeoJsonPolygonStyle geoJsonPolygonStyle = new GeoJsonPolygonStyle();

geoJsonPolygonStyle.setFillColor(ContextCompat.getColor(contex,R.color.mapFill)); //Please Pass actual context and colour
geoJsonPolygonStyle.setStrokeColor(ContextCompat.getColor(context,R.color.mapOutline)); //Please Pass actual context and colour

for(GeoJsonFeature f:geoJsonPolygonLayer.getFeatures()){
    f.setPolygonStyle(geoJsonPolygonStyle);
}
geoJsonPolygonLayer.addLayerToMap();
This code has been adapted from Google’s sample implementation of polygons in their sample utility app showcasing Google Maps. Its open-source code can be found here.
Output
Here’s a screenshot of the actual working implementation of the above code.
Analysis of Code
Yup! Now it’s time to analyze the code. First, we defined a JSONObject named cord which is assigned the JSON file which has the city boundaries. Then we continue to make a GeoJsonLayer object and a GeoPolygonStyle attribute which would be used to add a layer to the map and stylize it respectively.
Then we apply the style for all the features(like fillColor and strokeColor) into the map using a for loop. Since the polygon style got applied, we finally add the layer to the map at the end.
There are many use cases where this feature of Google Maps can be used like if you own a business that provides area-specific details and services to users, you can show them the map depicting the area where they can use the service in.
Another case includes, If you run a nonprofit organization that also does the same, area-specific work, they can leverage the maps in their app.
Conclusion
I hope this guide was very beneficial for you in your need to add a boundary to a google map, in fact, it can be added to any map(by changing the code a bit) which supports adding polygons to it.
This guide will be very useful for those who are struggling with adding the boundary. So I recommend sharing this article with your friends who need this too! This will make my day.


