![Solidity Quickstart [0]](https://ik.imagekit.io/genicsblog/tr:w-1920,h-1080,f-webp/https://user-images.githubusercontent.com/46792249/156168666-85804b30-d9db-4d0e-9433-4a668d42f65c.png)

Hey folks 👀. Hope y’all are doing great. You might have heard about web3 and its hype on Twitter and maybe you wanna explore it as well.
Well, so today I am here to give all a quick tour of solidity 🚀. So let’s get started.
NOTE: This blog post isn’t a complete tutorial of solidity. You can take this blog post as a quickstart for the journey with solidity and web3.
If you are in search of resources, checkout the resources notion page of X Days of Solidity.

🤔 What’s Solidity?
Solidity is a programming language for implementing smart contracts.
Smart contracts are simply programs stored on a blockchain that run when predetermined conditions are met.
An advantage of these programs is that you can verify they are what they are and do what they claim they are doing.
This allows for a permission-less autonomous ecosystem between untrusted and anonymous stakeholders.
Solidity is a curly-bracket language with the influence of C++, Python, and JavaScript being visible.
Enough of theory, now let’s dive into solidity 🚀
🛠 Setting up developer environment
Before working with Solidity, we would have to set up our development environment in such a way that we could local test them 🚀.
👀 Magical powers of Hardhat
We would be using a tool called Hardhat. This would create a local Ethereum network and give us fake test ETH and fake test accounts to work with. Sounds interesting right?
So what are you waiting for? let’s set up Hardhat 🚀.
- Create a new folder for the project
mkdir x-days-of-solidity - Navigate into that folder
cd x-days-of-solidity - Initializing the project
npm init -y- If you get an error saying
npm command not foundthen go ahead and install NodeJS. Install the LTS version
- If you get an error saying
-
Installing Hardhat
npx hardhatYou would be presented with a prompt something like this
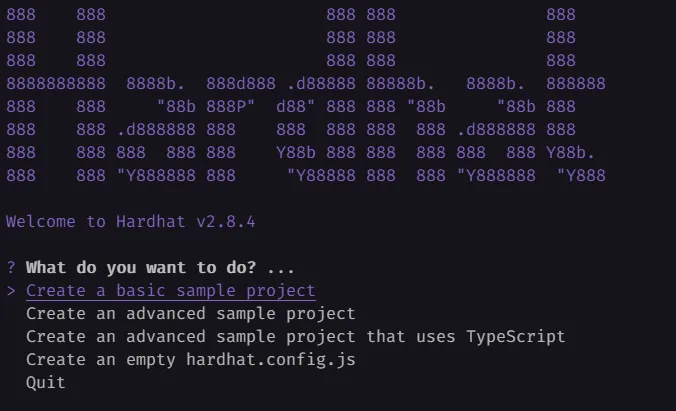
Let’s choose the first option and press enter for the rest of the options
-
We would have to install a few other dependencies as well
npm install --save-dev chai ethereum-waffle @nomiclabs/hardhat-waffle ethers @nomiclabs/hardhat-etherschaiis a testing library.ethereum-waffleis the waffle package by which you can test your smart contracts.@nomiclabs/hardhat-waffleallows to test smart contracts using waffle and hardhat.ethersis a library for complete Ethereum wallet implementation.@nomiclabs/hardhat-ethersis a hardhat plugin for ethers.
📁 Folder structure
After you have completed setting up the developer environment you would see a folder structure similar to this

-
contractsis the folder where all our smart contracts would be stored. -
scriptsis the folder where all scripts such asrun.jsanddeploy.jswould be stored. -
testis the folder where all our chai tests would be stored.
👋 Hello, World!
Let’s get started by creating a smart contract using solidity that prints “Hello, World!” in the terminal

First of all let’s clean up the default hardhat contract, script, and test files. Let’s create a new file called HelloWorld.sol inside the contracts folder.
Let’s get started by adding a ✨SPDX License Identifier✨. It’s just a fancy comment, which tells the license of your smart contract.
In my case, I am going to be using the MIT license.
// SPDX-License-Identifier: MIT
Let’s now specify the the version of solidity compiler. As we are using Hardhat, we have to check that the solidity compiler version in the hardhat.config.js file is the same as we are specifying in our smart contract

pragma solidity ^0.8.4;
As solidity doesn’t natively support “console logs” we would have to use the magical powers of Hardhat again. Hardhat allows use to use “console logs” in solidity.
import "hardhat/console.sol"
Now we have the superpowers to use console log in solidity. This makes debugging much simpler.
Let’s now start writing the actual smart contract 👀. In solidity, the syntax of a smart contract is similar to classes in other programming languages.
contract HelloWorld {
    constructor() {
        console.log("Hello, World");
    }
}
We use the contract keyword along with the contract name to define a contract. Defining a contract is similar to defining a class in other programming languages like JavaScript.
Any code inside the constructor is run once when the contract is been deployed.
// SPDX-License-Identifier: MIT

pragma solidity ^0.8.0;

import "hardhat/console.sol";

contract HelloWorld {
    constructor() {
        console.log("Hello, World");
    }
}
TADA 🎉! We have written our first smart contract. But 🤔 How to run it locally?
⚙ Running smart contract locally
We would use creating a script (run.js) and run the smart contract using that script and Hardhat.
Create a new file called run.js under the scripts folder.
Let’s first get our smart contract, compile it, and generate all the necessary files under the artifact folder.
artifactfolder is similar to abuildfolder
const helloWorldFactory = await hre.ethers.getContractFactory('HelloWorld');
Let’s now deploy our compiled smart contract to the local blockchain
const helloWorld = await waveContractFactory.deploy();
We will wait until our smart contract has been officially deployed on the local blockchain.
await waveContract.deployed();
We would only see the “Hello, World!” console log only after the smart contract has been officially deployed on the local blockchain because the code inside constructor only runs once when the smart contract has been deployed.
Let’s add a console log to the run script which tells the address of the account where our smart contract has been deployed.
console.log('Contract deployed to:', helloWorld.address);
Finally, our run.js script would look something like this
const main = async () => {
  const helloWorldFactory = await hre.ethers.getContractFactory('HelloWorld');
  const helloWorld = await helloWorldFactory.deploy();
  await helloWorld.deployed();
  console.log('Contract deployed to:', helloWorld.address);
};

const runMain = async () => {
  try {
    await main();
    process.exit(0);
  } catch (error) {
    console.log(error);
    process.exit(1);
  }
};

runMain();
I have added a new runMain function that would catch errors while deploying
Now let’s run it using npx hardhat run scripts/run.js command
You would see the output something like this

TADA 🎉! You have created a smart contract and deployed it as well
Let’s talk more about solidity now 🤔.
📦 Data types in Solidity
🔢 Integers
In solidity, there are two types of integers unsigned integers (uint) and signed integers (int).
Unsigned integers are non-negative integers whereas signed integers are negative integers (PS: ** means to the “to the power of” or “exponent operator” aka ^ )
-
uint8ranges from 0 to 2 ** 8 - 1 -
uint16ranges from 0 to 2 ** 16 - 1 -
uint256oruintranges from 0 to 2 ** 256 - 1 -
int8ranges from -2 ** 8 to 2 ** 8 - 1 -
int16ranges from -2 ** 16 to 2 ** 16 - 1 -
int256orint256ranges from -2 ** 256 to 2 ** 256 - 1
📍 Address
There is a special data type, “Address”. Address is a 20 byte long (size of an ethereum wallet address) data type in solidity.
🏹 Array
Syntax:
<data type> <array name>[size] = <initialization>
In solidity, you can create a fixed (with only a specific length) and dynamic (the length of the array can be anything)
// An array of fixed length of 10 unassigned integers
uint[10] myFixedArray;

// An array of the dynamic length of strings
string[] myDynamicArray;
✨ Array operations
Let’s now talk a look at the array operation in solidity 👀
-
Accessing an element from an array: Accessing an element from an array in solidity is just like in any other programming language
 // SPDX-License-Identifier: MIT

 pragma solidity ^0.8.0;

 import "hardhat/console.sol";

 contract AccessingElement {
     string[3] data = ["hi", "hello", "yo"];

     constructor() {
         console.log(data[1]);
     }
 }
Here are creating a fixed array of name
dataand data typestringand length of 3. We are trying to console log the second element of the array, which ishello.Let’s try to run it now using
npx hardhat scripts/run.jsNOTE: You need to change the name of the smart contract which you are compiling in the
scripts/run.jsfile.TADA 🎉! It worked

-
Assigning values: Let’s now assign values to an array
// SPDX-License-Identifier: MIT

pragma solidity ^0.8.0;

import "hardhat/console.sol";

contract AssigningValues {
    string[5] data = ["hi", "hello", "yo"];

    constructor() {
        data[3] = "yo yo";
        console.log(data[3]);
    }
}
Here we are trying to assign the value of the 4th element of the array as
yo yo.Let’s test it out.
TADA 🎉! It worked

-
Length of an array: Let’s now find the length of an array.
You can use the
lengthmethod to get the length of an array. Similar to how to find the length of an array in JavaScript.// SPDX-License-Identifier: MIT pragma solidity ^0.8.0; import "hardhat/console.sol"; contract ArrayLength { string[3] data = ["hi", "hello", "yo"]; constructor() { console.log(data.length); } }Let’s test it out
TADA 🎉 It worked

-
Push: Push is used to add elements to the end of a dynamic array.
// SPDX-License-Identifier: MIT pragma solidity ^0.8.0; import "hardhat/console.sol"; contract AddingElement { string[] data = ["hi", "hello", "yo"]; constructor() { data.push("yo yo"); } } -
Pop: Pop is used to remove the last element from a dynamic array
 // SPDX-License-Identifier: MIT

 pragma solidity ^0.8.0;

 import "hardhat/console.sol";

 contract AddingElement {
     string[] data = ["hi", "hello", "yo"];

     constructor() {
         data.pop();
     }
 }
Phew, that was long 😓
🗜 Structs
Structs are more complex data types, where you can combine multiple data types to create your own complex data type.
struct myStruct = {
  address myAddress;
  uint myNumber;
  string myName
}
We can use structs with arrays too!
struct Person = {
  string name;
  uint age
}

Person[] personArray; // Creates a dynamic array

Person james = Person("James", 25) // Creates a new Person

personArray.push(james); // Adds that new person to the `personArray` array
🔤 Variables in Solidity
Syntax:
<data-type> <access-modifier> <variable-name>;
🌀 Types of variables
In solidity, there are 3 different types of variables:
-
state: State variables are declared in contract scope. Stored on the blockchain. -
local: Local variables are declared inside functions. Destroyed after execution and not stored on the blockchain. -
global: Global variables are some special variables that can be used globally and give information about the transactions and blockchain properties.
✨ Variable modifiers
There are 2 variable modifiers for state variables
-
constant, disallow assignment (except initialization), does not occupy storage slot. -
immutable, allows exactly one assignment at construction time and is constant afterward. Is stored in code.
👋 The End
That’s the end folks 👋. I would be releasing another part on “Solidity Quickstart” on “Functions in Solidity” and “How to deploy the smart contract to a test net”, such as Rinkeby
The code for this entire “Solidity Quickstart” series would be available on my GitHub.


 Array Initialization")

