


Today, you will learn to build a WhatsApp REST API using Node.js and Express using Puppeteer and web scraping!
Although we won’t be doing actual web scraping, we will use a library that does everything for you and makes it very easy to work with WhatsApp programmatically.
Setup
Express server setup
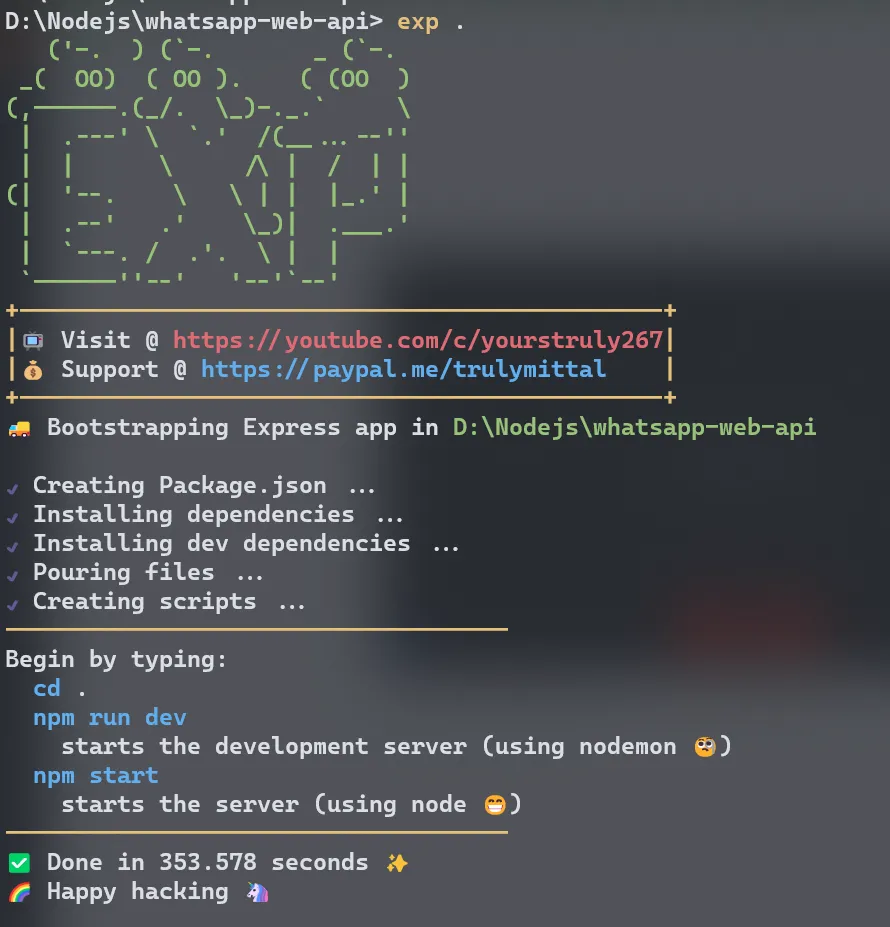
To set up the express server, we are not going to do it from scratch, we’ll use a generator called express-draft by YoursTruly. First, install express-draft globally and use the following command to generate an express app.
npm i -g express-draft
exp .
Install Whatsapp Web library
Caution: Installing this package will also download Chromium because of Puppeteer. To disable Chromium download, follow the steps on this post.
There’s an awesome open-source Whatsapp client that connects through the Whatsapp Web browser app made by Pedro S. Lopez.
First, we’ll install it through npm (or yarn).
npm i whatsapp-web.js
After we’re done with that, we can set it up in our app.js file by following the given example.
We can alter the file as follows:
const express = require('express');
const createError = require('http-errors');
const morgan = require('morgan');
const { Client } = require('whatsapp-web.js');
require('dotenv').config();

const SESSION_FILE_PATH = './session.json';
let sessionCfg;
if (fs.existsSync(SESSION_FILE_PATH)) {
  sessionCfg = require(SESSION_FILE_PATH);
}

const client = new Client({
  puppeteer: { headless: false }, // Make headless true or remove to run browser in background
  session: sessionCfg,
});

client.initialize();
While using this library, whenever a user logs in, their information will be stored in a session.json file, which is then used to authenticate the user the next time when the server starts.
Important: Create a nodemon.json file in the root folder and add these contents to ignore the session.json file whenever it changes.
// "$schema" can be omitted. It's just used for IntelliSense. REMOVE THIS COMMENT
{
  "$schema": "https://json.schemastore.org/nodemon.json",
  "ignore": ["session.json"]
}
Creating routes and user login
Using events
whatsapp-web.js has a lot of events to work with, and we’ll now use some of them to get the QR code, check the authentication, etc.
// Add this after express code but before starting the server

client.on('qr', qr => {
  // NOTE: This event will not be fired if a session is specified.
  console.log('QR RECEIVED', qr);
  app.get('/getqr', (req, res, next) => {
    res.send({ qr });
  });
});

client.on('authenticated', session => {
  console.log('AUTHENTICATED', session);
  sessionCfg = session;
  fs.writeFile(SESSION_FILE_PATH, JSON.stringify(session), function (err) {
    if (err) {
      console.error(err);
    }
  });
});

client.on('auth_failure', msg => {
  // Fired if session restore was unsuccessfull
  console.error('AUTHENTICATION FAILURE', msg);
});

client.on('ready', () => {
  console.log('READY');
});

// Listening for the server
const PORT = process.env.PORT || 3000;
app.listen(PORT, () => console.log(`🚀 @ http://localhost:${PORT}`));
The above code uses events provided by the library to tackle different situations. They are pretty self-explanatory so I am not gonna explain each of them.
In the qr event, we create a route that sends the QR code as the response. The QR code is in raw format, meaning it needs to be generated so for the purpose of this tutorial, we’ll use a library called qrcode-terminal to show the QR Code in the terminal.
// Run `npm i qrcode-terminal` before adding this code

const qrcode = require('qrcode-terminal')

client.on('qr', qr => {
  // NOTE: This event will not be fired if a session is specified.
  console.log('QR RECEIVED', qr);
  qrcode.generate(qr, { small: true }); // Add this line
  app.get('/getqr', (req, res, next) => {
    res.send({ qr });
  });
});
The sendmessage endpoint
Now that we have everything set up, let’s do the most exciting part that is to send a message using our own API.
For that, we create a route in the app.js file itself.
Let’s create the POST endpoint for sendmessage and it will be an async function with a try-catch block.
app.post('/sendmessage', async (req, res, next) => {
  try {
    // Magic happens here
  } catch (error) {
    next(error)
  }
})
In the body of the request, the user has to enter two pieces of data.
- Mobile number
- Message
We’ll identify those as number and message respectively. We will get them from the request body, and use them to easily send the message from the client to the given number.
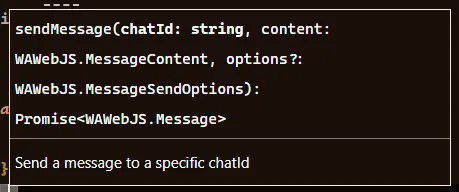
To send a message, we use the client.sendMessage method. These are the arguments we need to pass in
app.post('/sendmessage', async (req, res, next) => {
  try {
    const { number, message } = req.body; // Get the body
    const msg = await client.sendMessage(`${number}@c.us`, message); // Send the message
    res.send({ msg }); // Send the response
  } catch (error) {
    next(error);
  }
});
Now here, in the sendMessage method, we pass in the mobile number and the message itself. With the mobile number, we have to attach @c.us at the very end, so we do that with template literals in JavaScript.
Testing the API
In order to test our API, we first run it using the command npm run dev. That will open up a browser (if you’ve set headless to false)
Running the server will give us the QR Code to authenticate because it’s the first time you run it. So, you have to scan it through WhatsApp.

Once authenticated, you will notice that a session.json file has been created with the following contents.

Now in VS Code itself, we’ll use an extension called Thunder Client, which works like Postman for API testing. Here’s the link to install it.
Create a New Request in Thunder Client, and then add the following details. In the number field, add the mobile number followed by the country code of the number.
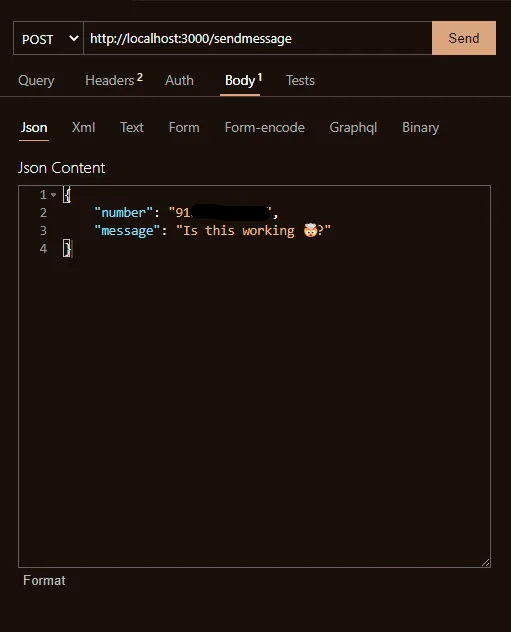
Look at the image carefully
And then hit Send.
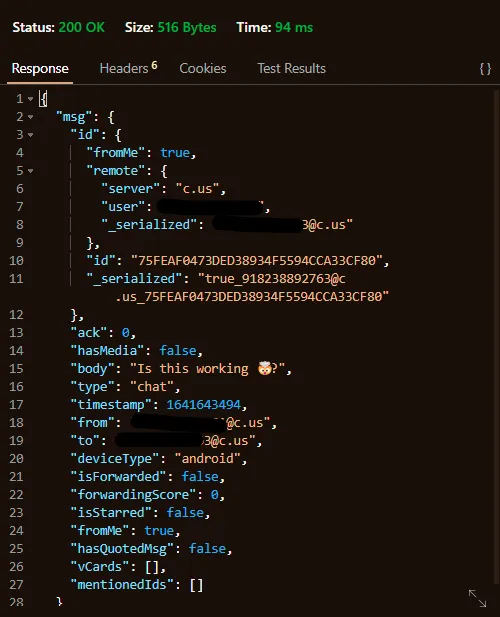
If the message is sent successfully, the number you entered will receive it and you will get back the msg as the response. If not, you will get an error.

Conclusion
You can read more about the library here.
I hope you enjoyed building out the WhatsApp API using Node.js, Express, and whatsapp-web.js.
Comment down your thoughts! There is always room for improvement so let me know your suggestions on this project!
Connect with me on my YouTube channel and my Twitter 😉
Until next time, keeping awesome ✌️.


![9 Hand Picked FREE Heroku Alternative Hosting Platforms [2023]](https://ik.imagekit.io/genicsblog/tr:w-1920,h-1080,f-webp/https://github-production-user-asset-6210df.s3.amazonaws.com/46792249/248472961-50430fff-be12-42ad-b556-77827be62fc0.jpg "9 Hand Picked FREE Heroku Alternative Hosting Platforms [2023]")


